If you only need to make small adjustments to an existing widget or layout, you can simply subclass the widget or layout and override its methods which will give you precise control over the appearance and function of a screen element.
This tutorial explains you how to create custom Views and use them in your application using simple and easy steps.
Creating a Simple Custom Component
The simplest way to create your custom component is to extend an existing widget class or subclass with your own class if you want to extend the functionality of existing widget like Button, TextView, EditText, ListView, CheckBox etc. otherwise you can do everything yourself by starting with the android.view.View class.At its simplest form you will have to write your constructors corresponding to all the constructors of the base class. For example if you are going to extend TextView to create a DateView then following three constructors will be created for DateView class:
public class DateView extends TextView {
   public DateView(Context context) {
      super(context);
      //--- Additional custom code --
   }

   public DateView(Context context, AttributeSet attrs) {
      super(context, attrs);
      //--- Additional custom code --
   }

   public DateView(Context context, AttributeSet attrs, int defStyle) {
      super(context, attrs, defStyle);
      //--- Additional custom code --
   }
}
Because you have created DateView as child of TextView so it will have access on all the attributes, methods and events related to TextView and you will be able to use them without any further implementation. You will implement additional custom functionality inside your own code as explained in the given examples below.
If you have requirement for implementing custom drawing/sizing for your custom widgets then you need to override onMeasure(int widthMeasureSpec, int heightMeasureSpec) and onDraw(Canvas canvas) methods. If you are not going to resize or change the shape of your built-in component then you do not need either of these methods in your custom component.
The onMeasure() method coordinate with the layout manager to report the widget's width and height, and you need to call setMeasuredDimension(int width, int height) from inside this method to report the dimensions.
You can then execute your custom drawing inside the onDraw(Canvas canvas) method, where android.graphis.Canvas is pretty similar to its counterpart in Swing, and has methods such as drawRect(), drawLine(), drawString(), drawBitmap() etc. which you can use to draw your component.
Once you are done with the implementation of a custom component by extending existing widget, you will be able to instantiate these custom components in two ways in your application development:
Instantiate using code inside activity class
It is very similar way of instantiating custom component the way you instantiate built-in widget in your activity class. For example you can use following code to instantiate above defined custom component:@Override protected void onCreate(Bundle savedInstanceState) { super.onCreate(savedInstanceState); setContentView(R.layout.activity_main); DateView dateView = new DateView(this); setContentView(dateView); }Check this example to understand how to Instantiate a Basic Android Custom Component using code inside an activity.
Instantiate using Layout XML file
Traditionally you use Layout XML file to instantiate your built-in widgets, same concept will apply on your custom widgets as well so you will be able to instantiate your custom component using Layout XML file as explained below. Here com.example.dateviewdemo is the package where you have put all the code related to DateView class and DateView is Java class name where you have put complete logic of your custom component.<RelativeLayout xmlns:android="http://schemas.android.com/apk/res/android" xmlns:tools="http://schemas.android.com/tools" android:layout_width="match_parent" android:layout_height="match_parent" android:paddingBottom="@dimen/activity_vertical_margin" android:paddingLeft="@dimen/activity_horizontal_margin" android:paddingRight="@dimen/activity_horizontal_margin" android:paddingTop="@dimen/activity_vertical_margin" tools:context=".MainActivity" > <com.example.dateviewdemo.DateView android:layout_width="match_parent" android:layout_height="wrap_content" android:textColor="#fff" android:textSize="40sp" android:background="#000" /> </RelativeLayout>It is important to note here that we are using all TextView attributes along with custom component without any change. Similar way you will be able to use all the events, and methods along with DateView component.
Check this example to understand how to Instantiate a Basic Android Custom Component using Layout XML file.
Custom Component with Custom Attributes
We have seen how we can extend functionality of built-in widgets but in both the examples given above we saw that extended component can make use of all the default attributes of its parent class. But consider a situation when you want to create your own attribute from scratch. Below is a simple procedure to create and use new attributes for Android Custom components. Consider we want to introduce three attributes and will use them as shown below:<com.example.dateviewdemo.DateView android:layout_width="match_parent" android:layout_height="wrap_content" android:textColor="#fff" android:textSize="40sp" custom:delimiter="-" custom:fancyText="true" />
Step 1
The first step to enable us to use our custom attributes is to define them in a new xml file under res/values/ and call it attrs.xml. Let's have a look on an example attrs.xml file:<?xml version="1.0" encoding="utf-8"?> <resources> <declare-styleable name="DateView"> <attr name="delimiter" format="string"/> <attr name="fancyText" format="boolean"/> </declare-styleable> </resources>Here the name=value is what we want to use in our Layout XML file as attribute, and the format=type is the type of attribute.
Step 2
Your second step will be to read these attributes from Layout XML file and set them for the component. This logic will go in the constructors that get passed an AttributeSet, since that is what contains the XML attributes. To read the values in the XML, you need to first create a TypedArray from the AttributeSet, then use that to read and set the values as shown in the below example code:TypedArray a = context.obtainStyledAttributes(attrs, R.styleable.DateView); final int N = a.getIndexCount(); for (int i = 0; i < N; ++i) { int attr = a.getIndex(i); switch (attr) { case R.styleable.DateView_delimiter: String delimiter = a.getString(attr); //...do something with delimiter... break; case R.styleable.DateView_fancyText: boolean fancyText = a.getBoolean(attr, false); //...do something with fancyText... break; } } a.recycle();
Step 3
Finally you can use your defined attributes in your Layout XML file as follows:<RelativeLayout xmlns:android="http://schemas.android.com/apk/res/android" xmlns:tools="http://schemas.android.com/tools" xmlns:custom="http://schemas.android.com/apk/res/com.example.dateviewdemo" android:layout_width="match_parent" android:layout_height="match_parent" android:paddingBottom="@dimen/activity_vertical_margin" android:paddingLeft="@dimen/activity_horizontal_margin" android:paddingRight="@dimen/activity_horizontal_margin" android:paddingTop="@dimen/activity_vertical_margin" tools:context=".MainActivity" > <com.example.dateviewdemo.DateView android:layout_width="match_parent" android:layout_height="wrap_content" android:textColor="#fff" android:textSize="40sp" custom:delimiter="-" custom:fancyText="true" /> </RelativeLayout>The important part is xmlns:custom="http://schemas.android.com/apk/res/com.example.dateviewdemo". Note that http://schemas.android.com/apk/res/ will remain as is, but last part will be set to your package name and also that you can use anything after xmlns:, in this example I used custom, but you could use any name you like.
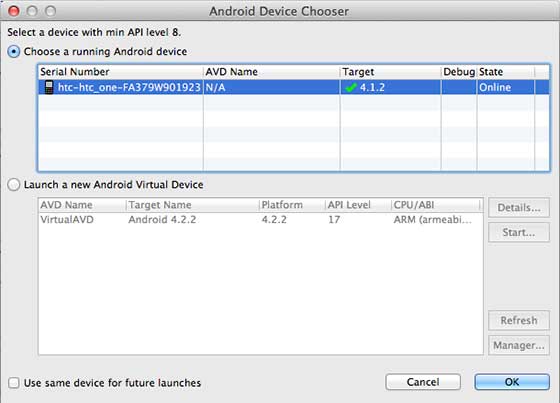
 icon from the toolbar. Before starting your application, Eclipse will display following window to select an option where you want to run your Android application.